Thursday, March 31, 2016

Maya - Introduction to Rendering

These are screenshots from the Introduction to Rendering Tutorial in Maya.


First is the "understanding the render view" lesson, which basically just goes over how the render view works. It goes over some features like rendering only selected areas and how to cancel a render in progress.


This screenshot is from the "Selecting a render engine" tutorial. It goes over the differences between render engines and how they work. I basically only use mental ray, but I did find the maya vector to be pretty cool, though I don't know that I'd ever have anything to use it for.


This lesson is "using the render region" and it goes over the different settings for the render region, such as auto resize or auto render region.


This lesson is over saving and comparing renders, which is something I knew how to do before this tutorial. All you have to do is click a button to save the image, but it's very useful.


This lesson goes over aliasing and anti-aliasing and how those effect your renders. It showed how to increase the edge quality by stepping up the level of anti-aliasing.


This lesson goes over the mental ray sampling modes, and the settings for them. Basically increasing sampling increases quality.

 Here is where the tutorial over IPR would go, but the project files seemed corrupted or something. Every time I'd open that project file, the computer would lock up and freeze. I tried redownloading the project files but that didn't fix it.


This is the tutorial over using the resolution gate. It seems pretty handy that you can see exactly what will be rendered. There's a button with a blue circle in it that you click, and you can adjust the size to really know what you'll be rendering. Very useful.


This is from the "viewing high resolution textures in hypershade." I think this tutorial is slightly dated though, because on the video the texture wasn't shown at all in hypershade. In Maya 2016, it automatically shows the texture on the top right.


This is from the tutorial over setting up a batch render and batch rendering. You can render frame by frame and save each to a custom filepath which is useful for animations, and you can have it render while still being able to move around in Maya.


This lesson goes over setting up renderable cameras and their settings. You can also render multiple cameras at once if you want. In the image above, Maya would render from basically what I'm seeing because I have the render_cam selected in the settings, and I'm looking through the render_cam in the viewport.


This is the final video which ironically goes over one of the first things I learned about rendering -- changing the resolution of your render. You can set any aspect ratio you want, as well as some presets. You can also select to preserve the aspect ratio at the click of a button.

I enjoy doing render work because it's really satisfying to see how good you can make things look. I especially love rendering lights and seeing how they bounce around the scene and reflect.
Overall, these tutorials were useful and informative, and I learned new things that will help my renders look more professional in the long run.

Tuesday, March 29, 2016

Maya Rigging - Videos

Here a few videos showing the moving aspects of rigging.


This is from the tutorial over rotate plane and single chain solvers.


This is from the video over Spline IK rigging.


This is from the video over the aim constraint.


And this is from the video over the lattice deformer.

Monday, March 28, 2016

Rigging in Maya

These are screenshots from the introduction to Rigging in Maya tutorials. Videos will be up soon since I finished the tutorials before knowing I had to videos, so I'll have to go back and record those.


This is parenting objects. I've done this before in other contexts, so it's pretty simple.


Here is modifying the pivot of the object. I do this all the time to change where the pivot snaps to, so I've done this before as well.


This is creating my first joints, something I have never done. It seems simple though, just click and drag and it creates joints, similar to where curve points would be on a spline.


This is the "Joint Attributes" lesson, and in this one it just goes over various joint options, such as the orientation and angles and such.


This is the next lesson, which goes over disconnecting joints. Useful for if you need to disconnect a joint, it's pretty simple.


This is going over how to remove a joint "non-destructively" as the lesson title says. It's useful for removing joints without messing up your chain. All you have to do is go to Skeleton>remove joint. 


This lesson goes over the differences between the single chain solver and the rotate plane solver. 


This is from the lesson over rigging with the spline IK solver. It's useful for things like tails or grappling hooks, and it seems to work kind of like soft-selection does, but with joints.


This lesson is over controlling spline IK systems. It involves adding clusters to move the joints around.


This lesson shows how to add animator-friendly controls. In this lesson, I used nurbs circles to create easy to see and manipulate controls for the grappling hook.


This lesson just goes over groups and how to use them to make your setup cleaner and more user-friendly.


This lesson goes over IK and FK blending, and adding a custom control to toggle IKFK on and off.


This lesson explains and details the node editor and how it works in Maya.


This lesson goes over driven key relationships and how to set them. Driven keys allow you to create sort of keys for animating where, if you move a part of it, the rest will follow it. For example, in the picture above, I can slide the hook along the spline in an arc, but if I make it a flat horizontal line, it will slide along that as well.


This lesson goes over the aim constraint, and how locators work. I've used these before in Principles of Animation when I animated my character's eyes.


This lesson goes over rotation order and the hierarchy of how they rotate. I had no idea that this even existed before this lesson, I always assumed that stuff just rotated. This details "gimball lock" where you lose control of an axis when you rotate something a certain way. It can cause strange animations and weird wobbles.


This is Maya's lattice deformer, something I am familiar with. This lesson uses it as a way to have the shark appear to ark through the air. I have used it on curtains, where I made a lattice cage so I could have easy to edit points to pinch or flay out the curtain.


This lesson goes over smooth binding. It covers the smooth bind options and how they work.


This is the lesson on editing smooth skin deformations. This picture is from the "paint skin weights" tool part where you can actually paint weights into the skin so it will deform differently.


This lesson covers mirroring weights, which is useful if you have a symmetrical model. This allows you to not have to do the same work twice!


This is the lesson over Maya's "blend shape deformer" which allows you to create expressions and slide between them, then edit the face and have everything else follow it.


This lesson goes over rearranging an object's input order, which is changing the order of input operations for the model.


The final lesson goes over customizing maya. I know a little about customizing shelves in maya and stuff, but in this tutorial, he details adding custom scripted commands and changing their icon properties and even editing the marking menu (which I don't really use much.)

Warhammer: 3D Coat

These are some screenshots from the Warhammer from 3d Coat. My license for 3d coat personal use has expired which prevents me from saving, and I need to spend time working on more current work so this is what I have.


This is the rope that goes on the handle. This was made by putting 3 cylinders together and doing some deformations on them. Then we retopologized the result, and made it so it was seamless (in a sense) so that I could use it for curves. Then you can maneuver points around to fit it how you want.


This is the hammer head with the welding detail in. This was done by using the sphere tool along the seams to give it the welded look.


This is the hammer head and handle sculpted. I went through and added more weld points, and really gave it a beat up look. I cut into the surface, added dents, and generally just tried to make it look like something that would be produced at an old blacksmith's shop.

You can also see the wood grain that I got by stretching out one of the stencils and lightly sculpting over it.


This is using stencils. In the tutorial, he made a custom stencil in Photoshop. I had trouble getting that to work, so I used one of the default ones to add inset diamonds on the head and on the ring below.


Wednesday, March 23, 2016

Zenith Radio


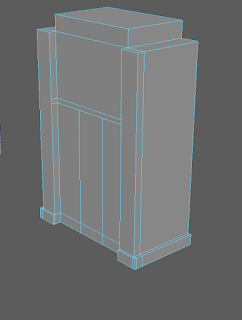
Here is first blocking out the shape of the radio at first.


This is a second attempt at blocking out the radio because I didn't like the first one.


This is the third incarnation of the radio, which i liked better. It has beveled edges on the sides and top.


'

Here is where I started breaking down the radio into different pieces and marking them by color.


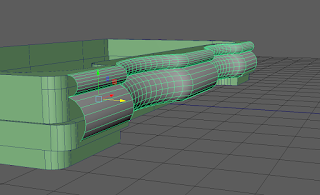
I separated off the bottom, because the actual bottom of the radio is much more curved than what I had.


I made the bottom by lining up two cylinders on their points, deleting all but the outward facing faces, and extruding the shell. Then I divided it a lot and used soft-selection for the curves.


This is the bottom of the radio attached to the blocked in top.


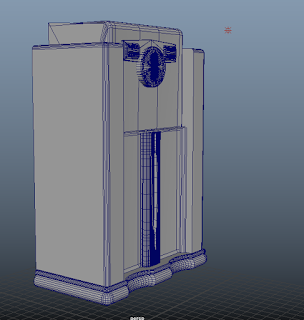
Here is the final model of the radio that I went with. It has the curved bottom, and the circle and buttons near the top. 


To the right of the finished radio is the low-poly version.


Here is a final render of the radio alongside the low poly version. This is after transferring the maps. I spent a long time trying to figure out what I did wrong with the maps, but I couldn't figure it out. The maps are below.

If the picture isn't too dark, you can look closely and see some of the detail transferred, like shapes, but it all seems to be blurry. I'm not quite sure why it didn't work since I had the low and high poly models in the same spot and they were the same size. I had the search envelope big enough and I tweaked it to fit all the small details I wanted preserved.